Curriculum sequencing & thoughtful retrieval: It’s beginning to pay off

We’ve been working on our Key Stage 3 Geography curriculum for several years now and we are starting to see our efforts begin to pay off with regards to the deliberate sequencing of knowledge. In this short post, I am going to reflect on a single, but significant, moment from my last lesson of the term with a Year 8 class.

During this lesson, in which I was introducing the formation of the Sierra Nevada region in the USA, I included a retrieval task at the start of the lesson based on the image below.

Diagram showing the process of subduction at a destructive plate margin

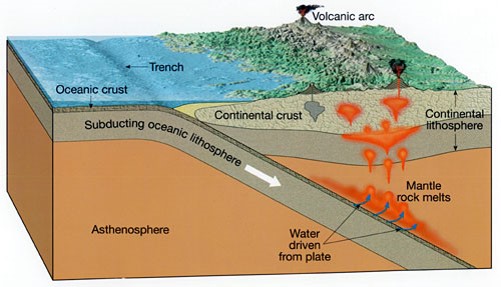
Students were asked to recall knowledge they had first acquired during Year 7 and had then covered again earlier in Year 8. Following a brief discussion and a little CFU (checking for understanding), I asked students to write an explanation of what was happening. I think it’s important to note that this wasn’t a quiz or list of 10 recall questions. Instead, this retrieval task required students to remember information and write several sentences to explain the sequence of events, not something which is easily done without reasonable knowledge and understanding of the processes involved.

Moving around the class, I was pleased to see the vast majority of students were able to confidently put pen to paper. The usual one-to-one support was needed in some parts of the room, but this was little more than a few prompts, questions or direction of how to start.

To provide students with feedback and ensure they had an opportunity to correct or improve their answers, I walked them through my answer whilst pointing to key features on the diagram. After each statement, I asked students to raise their hands if they had included a similar point, sentence or key term. Met with a sea of arms throughout most of my explanation, I was confident that we could move on to the focus of the current lesson, ‘How did the Sierra Nevada region form?’

The next phase of the lesson involved a full page of challenging text which included these opening paragraphs…

Study suggests parts of the Sierra Nevada formed in a “geologic instant,” more than twice as fast as previously thought.

Although we can’t see it in action, the Earth is constantly churning out new land. This can take place at subduction zones, where tectonic plates move towards each other and in the process create chains of volcanoes as one plate is forced under another. Some of this magma does not spew out, but instead mixes and morphs just below the surface. It then crystallizes as new continental crust, in the form of a mountain range.

Scientists have thought that the Earth’s mountain ranges are formed through this process over many millions of years. But MIT geologists have now found that the planet can generate new land far more quickly than previously thought.

By deliberately including this specific retrieval task at the start of the lesson, the opening passage of text was something the students already understood. Not only did this give them great confidence, but it meant they had an understanding of the vocabulary and, more importantly, an image in their minds of what was happening.

As we continued to read through the text, students had engaged their prior knowledge onto which they could attach new learning. This allowed for more effective learning of new knowledge but also the embedding of their previous understanding of the tectonic processes involved.

So how did we get to this stage?

During Year 7, we have written a unit which introduces tectonics for the first time and focusses on the physical processes occurring within the Earth’s interior. The process of subduction and the reasons why it happens are important. The basic concepts are introduced with regards to plate margins, and examples are shared from around the world Students participate in the drawing and labelling of diagrams, before being able to explain each type of margin.

A year later, in the early parts of Year 8, students revisit these ideas as they explore how ocean basins are created and destroyed. Here, the processes associated with plate movement are applied to the Wilson Cycle. Students once again are expected to use geographical vocabulary to explain processes, this time applying previous learning to a new area of geographical study.

So by the time these processes are brought in for a third time, during my lesson on Friday, most students were confident in their understanding and able to recall explanations with relative ease. At worst, some gentle prompting is required to get students on their way. Not only this, but I was then able to introduce even more complex disciplinary knowledge through a piece of challenging text. This would not have been possible had the relevant background understanding have not been available to students.

As 3pm arrived and the term came to an end, I was left with the pleasant thought that what we are doing is having a positive impact on learning with students now engaging with, and applying, geographical knowledge and understanding at a far higher level than I have experienced previously. I can’t think of a better way to head in to the school holidays!

Reflection

  • Retrieval practice does not have to be a quiz or series of recall questions. Instead, students can focus on one area of prior learning, shared through an appropriate task/format, to activate this for the current lesson.
  • The deliberate sequencing of the curriculum is essential if important ideas and concepts are to be learned, embedded and built upon over time.

My advice to ITTs & NQTs

Initial teacher training and the NQT year can be an overwhelming experience. Planning lessons, gathering evidence, observing colleagues and attending training can all build up and often seem like too much. Having taken on the role of ITT/ECT Lead at my school, I wanted to share a few pointers which I hope will help those in the earlier phases of their careers.

Organisation

Being organised and planning your week seems obvious but it is easy to let this slide. Take some time on a Thursday or Friday to ensure you know what is coming up next week. This isn’t just ‘Monday, Lesson 2 – Year 8’ but instead you should make a few notes about what you are teaching and other things you need to remember for each lesson. I jot down what I will cover in each lesson including key questions, knowledge to be retrieved, resources that need printing and whether or not homework or reminders need to be shared. This process ‘frees-up’ head space and these notes can be extremely valuable in the hours or minutes prior to each lesson.

Taking this further, all meetings, training and observations should be diarised so you can begin to see what your week will look like and where the pinch points are. It is also important to set aside time for reading. Whether you are improving your knowledge of pedagogy or your subject, this is an area all too often sacrificed as lesson planning can feel like it is dominating your every waking minute.

Planning a scheme

The most time-consuming, and often anxiety-inducing, task for an inexperienced teacher is lesson planning. The key here is to think big. Do not think about each lesson in isolation but instead, consider what needs to be covered over the next 4, 6 or even 10 lessons. What are the key concepts, knowldedge, and vocabulary you are going to teach? Ultimately, what do you want the students to know and be able to do as a result of your lessons?

This process should never start with a blank PowerPoint presentation but this is where many teachers go wrong. A PowerPoint is a resource – a tool used to support the delivery of a lesson. To begin designing a PowerPoint, if this is your preferred style, you must first know what you are going to teach. Below, I have outlined an example for a unit on plate tectonics in my subject, geography. Before I even think about lesson resources including the PowerPoint, I put pen to paper and think about these key areas:

  • Core content: What subject-specific knowledge needs to be learnt? E.g. structure of earth, plate margins, landforms
  • Vocabulary: Which words are new? Which words are important? E.g. asthenosphere, constructive margin, subduction
  • Key concepts: What concepts underpin this unit? E.g. scale – time and size, interconnections
  • Disciplinary knowledge: How do we know this? Who found out? E.g. pioneers of plate tectonic theory (Tharpe, Mohorovičić)
  • Procedural knowledge: How do we do this? E.g. Map skills, interpreting diagrams/data
  • Examples/case studies: Where is this happening? E.g. Himalayas, Mid-Atlantic Ridge

This gives me a framework to work from and I can begin to explore each area in more detail if required. Over time, my notes will evolve, become more detailed and I will formulate a sequence. I will also start to collate useful resources such as websites or books which will help me to deliver the content. Once I am happy with the sequence in which this content will be covered – similar to a contents page – I will then begin to create my resources including a PowerPoint, maybe!

Planning a lesson

I have a pretty simple outline for my lessons. Although I don’t stick to it 100% of the time, I find most of my lessons follow this structure.

Firstly, lessons will begin with retrieval practice. Quizzes are now commonplace at the start of lessons and I will often start a lesson with questions reviewing prior learning. But I think it is important to note that retrieval does not always need to be like this. For example, if an article is being used which calls upon prior learning, then signposting and discussing this is also a way of ensuring students recall content from last week, month or year. However this is done, giving students the opportunity to refresh past knowledge is a sound way to start a lesson.

Next, I will introduce the new content and I call this input. This is when I talk to the students using images, passages of text, graphs/maps, and short clips to aid my delivery. Although PowerPoint is a useful tool for sharing this content with students, it is worth remembering that this is not the only way to do this and sometimes the screen can be a distraction, especially when the slide displays reams of text.

Input is supported by checking for understanding (CFU). This often involves lots of questioning and gives me an opportunity to find out what the students are thinking about. I need to know if they understand what I have said before we can go any further. “Tell me what you now know about…” is effective and avoids single-word responses whilst identifying misconceptions. CFU becomes more meaningful when a large number of students are asked using a no-hands-up approach.

At this stage, if I’m not happy with the responses, I will pause and return to the input to re-explain the key ideas. If however, students are responding as I intend, I can then move into the practice phase of the lesson. This is where students complete a task or activity which gives them a chance to apply their knowledge and demonstrate new understanding.

Sometimes it is necessary to provide scaffolding at this stage. For example, verbal cues, writing frames or exemplars can give students the support required to complete a task successfully. Similarly, modelling is an effective technique for demonstrating what success looks like. A model answer can be analysed before the task or this can be used after an activity so students can reflect on their work.

Finally, I will give feedback within the lesson wherever possible. This isn’t simply a case of sharing the answers at the end of the lesson but is a constant process in which I seek to find out what the students are thinking about and help them to develop their knowledge and understanding further.

By planning my lessons in this way, it ensures I focus on the geographical content and whether or not students are learning. It is all too easy to get carried away with planning elaborate activities or creating time-consuming resources but the danger here is the purpose of the lesson can be lost. Thinking about lessons as I have outlined in this post will help you focus your attention in the right places and, hopefully, ensure you maximise your time.

If you’re in the early stages of your teaching career, always remember, it’s a hugely rewarding job and you’re having a huge impact on young people. Keep up the great work!

The Sun at the centre of the curriculum

The Sun’s gravitational force holds the solar system together whilst also providing light and heat. Without light and heat, there would be no life on Earth. The Sun is very important. There are also a number of other very important features within the solar system – planets, dwarf planets, moons, asteroids, comets, and meteors but it is the Sun, in the centre, that holds everything in place.

What has this got to do with curriculum?

Let us imagine the curriculum to be similar to the model of the solar system. Just as the Sun is at the centre of the solar system, subject knowledge is at the heart of the curriculum. It is our knowledge of the subject that underpins everything we do and it is knowledge that holds everything else in place.

Delivering an effective explanation, asking excellent questions or implementing rigorous assessments are all essential to delivering a strong curriculum yet none of these, or the other key areas of our practice, are as effective if they are not firmly rooted in a deep and broad knowledge of the subject.

More and more teachers are now basing their practice on educational research and many schools have adopted this approach when creating teaching and learning policies but we must pause and remember that this is not necessarily enough in itself. We need to stop and ask ourselves what makes an explanation effective? What makes a question excellent? What makes an assessment rigorous? Of course pedagogy needs careful consideration, and we must all continue to develop this, but underneath it all is the subject knowledge of an expert.

So throwing a retrieval quiz into the start of a lesson because this is seen as good practice isn’t actually good enough unless those questions are based on content that has been carefully selected. Retrieval also needs to be delivered in such as way as to develop students’ understanding and assist them in generating meaning. If we are not careful, we are simply enforcing that remembering a collection of facts is enough when this isn’t how you become a great geographer, for example.

Likewise, the teacher who asks most of the students in the room a question through cold calling is seen as doing something good. Again though, these questions must be designed not simply to check what has been remembered over the last 5 minutes but must help students understand what this information means and how it is part of the bigger picture.

With this in mind, we need to see more teachers spending their time reading and discussing their subject. In fact, we need schools to allow teachers to to spend more time reading and discussing their subject. Rather than using planning time and meetings to complete arbitrary tasks, how amazing would it be to sit together sharing thoughts on a recent publication or wrestling with each other about the content to be selected for the next unit in Year 8?

Everything we do is important but remember, the Sun is at the centre of the solar system.

Chapter overviews: focus on the core and hinterland

Last year, I introduced the idea of chapter overviews to our team. These would become single-page documents providing a brief summary of the content of each of the units we teach at KS3. We call the units we teach ‘chapters’ as collectively, they form our curriculum story. Although we have also created extensive schemes of learning which can span several pages, when combined to view the full curriculum, this can make for a rather hefty document. On a day-to-day basis, this level of detail is beyond the need of a busy teacher who is simply checking in on the core content to be covered over the next few lessons.

The chapter overviews provide us with a simple, accessible guide to keep us all on track and ensure we are delivering our curriculum consistently across the department.

Three Themes

Each chapter overview contains three main elements. This is what we want each teacher to be mindful of when delivering their lessons. These elements are the key questions, core knowledge and hinterland knowledge.

During our planning meetings, everyone is involved in the discussion regarding the key questions each chapter should cover. As you can imagine, this is never a quick task as we wrestle with ideas and quite often, each other! From here we then determine the core content. This, as Christine Counsell writes, can be described as “the ‘residue’ – the things that stay, the things that can be captured”. At this stage we are thinking about long term knowledge and the bigger picture. What do we want our students to know in one month, one year or five years? We are lucky to have two geography lessons a week in KS3 and three hours in KS4 but even with this relatively generous allocation, refining the core content in such a way as to provide breadth and depth can be extremely difficult and involves many lengthy and challenging conversations.

Once we have agreed upon the core, we then turn our thinking to the hinterland – the wider narrative in which the core sits. The hinterland is a really important element in the curriculum and it certainly isn’t a case of each teacher sharing whatever supplementary content they wish. We deliberate over this content in the same way we debate what is included in the core. The hinterland may include reference to famous geographers, topical events, specific case studies or simply really interesting geography that we don’t need students to learn at this stage to progress through the curriculum but we share it anyway. The hinterland is quite often learning for the sake of learning. I like to think of the hinterland as the supporting actor – would Pulp Fiction have been as good without Samuel L Jackson? Ultimately, ignore the hinterland and you may be left with a curriculum that reads more like a revision guide than a beautiful book.

Although many of our chapter overviews are still at an early stage and will continue to be edited over coming months and years, they have proven to be extremely useful to date. It is clear from department meetings that our shared vision for our curriculum is now being delivered to students more consistently. Better still, our resources are no longer the scheme. In the past it has been too easy to see the PowerPoint, or series of presentations, as the lesson plan or scheme of the learning. The issue with this is teachers are thinking about slide design, tasks or other important lessons features such as model answers or opportunities for assessment when creating a lesson resource and the content can become obscured. Although this thought process is essential when designing a lesson, it is not necessarily helpful when initially thinking about the content to be covered over the coming weeks. The chapter overviews have provided a simple one-page summary acting as the bridge between the larger schemes of learning and the individual lesson resources.

In time, I can see these pages evolving and possibly containing a reverse side with procedural knowledge, more detailed case studies and examples, key vocabulary and assessment opportunities. For now though, they are serving their intended purpose – to offer a quick-look guide into our curriculum and ensure we don’t miss the core or get lost in the hinterland.

A new found love… but will it last?

I started using a visualiser in my lessons in September 2020 after watching this video by Adam Boxer called Dual Coding for Teacher’s Who Can’t Draw. To say it changed my classroom practice is an understatement as I quickly discovered a visualiser, mini whiteboard and fine-tip pen would be essential tools in most of my lessons. Before you say anything, I know I’m late to the party and many teachers have been using them for years but it’s new to me and I just can’t use it enough!

I’ve always been ‘into art & design’ and feel confident in my ability to draw and sketch. I regularly use the whiteboard on my classroom wall to draw diagrams, sketches and mind-maps (or more recently, graphic organisers!) but when I started to use a visualiser and whiteboard, I found the way in which I carried out this part of the lesson evolved, especially with regards to delivering the accompanying explanation. When drawing on a large whiteboard, I have my back to the room and have to draw large features and labels. This means I have a choice – concentrate, and take time, on the diagram or turn my attention to the class and my explanation. Too often I find myself drawing/writing quickly (and scruffily) on the board with the aim of creating a simple visual aid for my explanation but since moving to my new equipment, this has changed.

Where it began…

In September 2020, I jumped straight in and tried to use the visualiser as much as possible. I felt that if I was going to make this work, I had to make it a habit. I was pleasantly surprised how quick it was to set up, even when having to move between rooms, but more than this, I could use it frequently without having to ‘strong-arm’ it into my practice. I needn’t have worried about creating a habit because within a couple of weeks, it was like I’d never been without one.

Early days and focus is on making this a habit.
It soon becomes clear that this is going to be a very useful piece of equipment.

Throughout September, when we were lucky enough to be in the classroom, I soon found myself using the visualiser in most lessons. I work a lot with pen and paper as this gives me the advantage of being able to save pages and use them again with the same group. It’s important to point out that the purpose of dual-coding is to take students on the journey with you so I only really used pre-drawn material with classes that had seen me create the visuals in the first place. I also prefer to use a pen and paper when the diagram or image I am trying to convey is intricate as this is better in terms of neatness and including the finer details.

Visualiser with pen and paper – incorporating dual coding into retrieval lesson with Y11.

As my confidence developed, my diagrams became more complex and my explanation also progressed. I was now adding layers and, starting with a blank page/board, would slowly build up the content whilst giving students the opportunity to practise as well. The tweet below was taken from a lesson exploring the hydrological cycle. The final diagram had taken a full hour to construct as students created and annotated their own plus there were many opportunities to stop, discuss and ask questions. Modelling the diagram and explaining the processes was followed by an assessment which worked well.

Using the visualiser to investigate the hydrological cycle. Layering knowledge over a full lesson.
Modelling a graphic organiser for Y8. A summary of the key features of the 3-cell model of atmospheric circulation in preparation for an assessment.

Where content is multiplex, it is more important to plan ahead. I will often draw out a sketch in advance of the lesson to ensure I have included all of the necessary features and that the diagram is neat and fit for purpose. This is something I would never have considered when using the board on the wall but taking the time to think things through before the lesson and practise drawing the visuals helps me deliver the content effectively in the lesson.

A pre-planned example of the diagram I will be drawing for an A-Level class. By starting from scratch in the lesson, I can layer the content to avoid cognitive overload and respond to feedback from students. It was important to plan this in advance to ensure the diagram was neat and all information was included.

A remote world…

At the start of 2021, schools closed their doors and once again turned to online learning as we entered another national lockdown. My school decided upon live lessons and this is where using a visualiser really came in handy. Having set up my new classroom in the box room of my home, I was able to deliver explanations in very much the same way I was doing throughout the autumn term. Having a visualiser and whiteboard with me at home meant I could continue to draw, annotate and quiz as I did in school. In doing so I could give the students in my classes a very similar lesson experience to the one they would have at school, at least in terms of my input and explanation.

January 2021: Remote learning using a visualiser.

Although I prefer to use diagrams and visuals wherever possible, this isn’t all I use my visualiser for. As can be seen below, they are also great for sharing and annotating text. The tweet below is from a lesson where I modelled the annotation of a geographical essay to help students with their academic writing. Through using a visualiser, I was able to annotate the text in real time and show this to students on the screen.

Annotating text under a visualiser provides an opportunity for live modelling.

Diagrams, images, photos and textbooks can all be shared under a visualiser. This is a really quick way to access resources which are not in a digital form.

The formation and processes of a meander.
Grid reference quiz as part of a remote lesson. Features can be pointed out easily on the board and the correct approach can be modelled.

So I’ll say it, I love my visualiser! However, will this love affair last? Over recent weeks, I have seen more and more teachers turning to graphic tablets, in some cases to replace their visualiser. The benefits seem obvious – a crisp, vivid display as well as being able to write over PowerPoints, maps, photos and text. This all seems really great and a lot of people are having success with their new toys. My head has certainly been turned and I’m considering whether this is the next step but for now, my visualiser isn’t going anywhere.

Live lessons continue and the visualiser-whiteboard combo make lessons a little more normal.